ReStory gameplay is easiest to understand as a repeatable service loop: receive an electronics job, read what the customer reports, identify the device family, inspect before ordering, choose repair actions that match the evidence, test the result, and close the conversation. The Steam product page presents ReStory: Chill Electronics Repairs as a repair-and-shop simulation with story elements. If you searched for ReStory: Chill Electronics Repairs gameplay or how to play ReStory, this page explains the broad rhythm first, then points to the site's focused guides. It does not invent route outcomes, a complete key map, hidden triggers, or an exact time to beat.
Expect a mix of device inspection, part decisions, bench work, customer dialogue, and longer-term shop or story progress. Treat the steps below as a practical checklist from this independent guide, not as an official answer key for every job.
02
What ReStory gameplay asks you to manage
The game is about more than opening a device and swapping a part. A job begins with a person and a description of a problem. You then need to turn that description into a useful inspection, decide which evidence matters, complete work at the bench, and return to the customer. The shop and its conversations give the repair work a wider context, so a good first goal is to understand the whole loop before searching for a single hidden answer.
A useful way to describe this game about repairing electronics is a story-led workshop simulation: observation, hands-on work, and customer decisions sit together. That description is a summary of the product and its visible store material, not a promise that every contract uses the same steps. Different devices can expose different parts or interactions. Keep the general process flexible and use the individual device pages when a specific model or component is involved.
03
The repeatable repair loop
A short checklist makes a busy shift easier to read. The sequence below is a practical organizing method based on the site's repair guide and the public workbench imagery. It is not a claim that the game enforces a single mandatory order in every scene. If the current screen gives a different instruction, follow the in-game prompt and record what changed.
Read the job
Separate the customer's reported symptom from your diagnosis. Record the exact words before deciding what is broken.
Identify the device
Start with its family and visible model clues. Open the device index when names or part roles are unfamiliar.
Inspect before shopping
Look for the area that matches the report. Avoid treating a plausible-looking part as proof that it is faulty.
Choose a test or part
Use the available evidence to narrow the next action. Compare compatible parts before spending or committing a repair.
Work carefully
Follow the visible bench prompts, keep track of removed pieces, and use rotation or zoom only when the task calls for it.
Check the result
Reassemble and run the available test or status check. If the symptom remains, return to diagnosis instead of repeating a guess.
Close and note the job
Read the customer's response, save any useful route observation, and separate confirmed outcomes from assumptions.
04
ReStory gameplay tips for a first shift
On a first shift, use a deliberately small objective: understand one job from intake to hand-back. Do not try to memorize every device family, customer thread, competition rule, and achievement at once. Write down the symptom, the first inspection you chose, the part or tool you used, and the result. That note helps you distinguish a repeatable clue from an action that happened to work once.
For example, imagine a generic handheld device that powers on only sometimes. This is a hypothetical troubleshooting example, not a confirmed scripted ReStory contract. Read the report, inspect the power-related area shown in the interface, and test one supported possibility at a time. If you change several things together, you cannot tell which choice solved the issue. If the game shows a different repair path, use that prompt and record it as an observation for later verification.
A useful first-session note can be one line per decision: reported symptom; inspected area; chosen action; result; customer response. It is faster to scan than a paragraph written from memory after the shift. If a result seems important to an ending or achievement, keep a separate note of the conversation options and do not assume that one option is permanently missable until it has been reproduced.
05
Diagnose devices and parts from evidence
The difference between diagnosis and replacement matters. A broken-looking component may be a clue, but appearance alone does not confirm the fault. Begin with the reported problem, inspect the relevant device family, and compare what the interface exposes with the customer description. The device and parts indexes are useful when you need names, roles, or nearby systems; they should not replace an in-game check when a result depends on a specific job state.
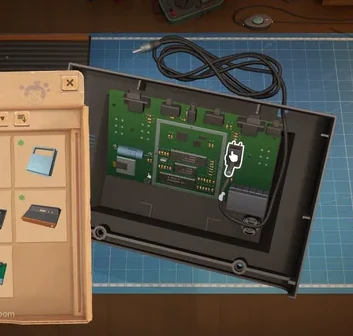
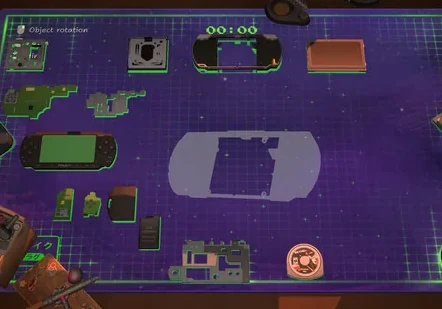
The screenshots on the official store page show an opened device and a separated parts layout. They help explain what kind of workbench view a player may encounter, but a screenshot cannot prove the correct replacement for a live contract. Use it as visual context, then follow the current screen. When a part name is unclear, check the site's parts page and retain the uncertainty if neither the official listing nor a reproduced game state resolves it.
If a repair fails, change one variable at a time. Return to the symptom, revisit the suspected area, and check whether the first action was supported by evidence. This avoids turning one uncertain guess into several. A repair log should include what you saw and what you changed, not only the final success message; that record is more useful when another player tries to reproduce the result.
- Confirmed: a detail visible in a current in-game prompt or an identified official source.
- Working note: a repeatable player observation that still needs a source or second check.
- Unknown: a route, binding, score effect, or unlock condition that has not been reproduced.
06
Customer conversations and story progress
Customer dialogue is part of the wider experience, not decorative text around a repair. Read each option before choosing, especially when the conversation refers to a relationship, promise, or earlier event. A useful note records the customer, the visible options, the choice made, and what the game showed afterward. Do not infer a hidden ending from one line of dialogue, and do not label a choice missable merely because it did not appear again in one run.
This page stays at the overview level because route consequences need direct verification. Use the customer index to identify recurring characters and the endings page for route-specific information. If your goal is to preserve a first playthrough, keep a save backup before a major decision and read the save-location guide; a backup protects progress but does not prove that a choice changes an ending.
07
Progression, competitions, and playtime
Once the basic loop feels familiar, split questions by topic. Use the competition guide for preparation notes, the cleanliness-rating page for workshop status questions, and the achievement guide for unlock tracking. This keeps the gameplay overview from becoming a second copy of each specialized answer. It also makes later corrections easier: a verified competition rule belongs on its focused page, while this guide can stay centered on how the parts of a shift fit together.
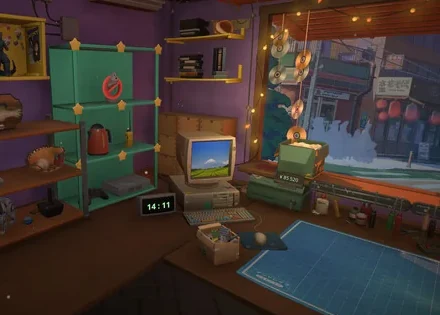
The visible store screenshot includes an in-game clock, but that is not a completion-time estimate. A clock in one image does not establish how long a campaign, first route, or replay takes. For hours-to-beat questions, use the separate playtime page, which distinguishes official information from player measurement. Record a start and end point if you want to compare sessions, and state whether pauses, menus, and retries were included.
08
What is confirmed and what remains open
The official Steam store page and its screenshots are the reference for public product facts and first-party media. The screenshots show a shop environment, an opened device, and workbench components. They do not show every task state, every key binding, the complete campaign route, or the result of every customer choice. The site's checklist is editorial guidance for organizing play, not a developer-issued manual.
This distinction matters when a search result promises an exact answer. A query such as ReStory gameplay tips can be answered with a safe process, but exact controller support, a complete keyboard map, a hidden trigger, a route lock, or a verified time-to-beat needs direct evidence. Where this guide cannot verify a detail, it says so and links to the most relevant page rather than turning a guess into a fact.
09
Gameplay questions: evidence and the next useful step
Use this map to separate what a source supports from the action you can take in a current run. The status column describes the evidence level, not a score or hidden game mechanic.
| Topic | What the evidence supports | Useful next step | Status |
|---|---|---|---|
| Repair shop | The official store page and screenshots present a repair-shop setting and bench work. | Read the job, identify the device, then inspect before replacing a part. | Product and image evidence |
| Part selection | Official images show devices and components; they do not reveal the answer to every job. | Use the device and parts indexes, then follow the current job prompts. | Visual context; per-job answer varies |
| Customer routes | The game is presented with story elements, but this page does not verify every consequence. | Record options and outcomes; consult the customer and endings guides. | Route-specific facts need reproduction |
| Time and controls | A screenshot shows an in-game clock and a rotation prompt, not a complete time or input specification. | Use current in-game prompts; see the playtime page for measured duration. | No complete verified map here |
10
The short version
Treat a shift as a chain of decisions: listen, identify, inspect, choose, repair, check, and report back. Keep official product facts separate from practical advice, and write down uncertain outcomes instead of promoting them to rules. When a question becomes specific, continue to the matching device, part, competition, playtime, customer, ending, or achievement guide.
11
ReStory gameplay FAQ
What do you do in ReStory gameplay?
You work through electronics repair jobs in a shop setting, inspect devices, choose repair actions, and speak with customers as the broader story progresses. The exact steps depend on the job shown in the current game state.
How do I start a repair in ReStory?
Read the customer's report first, identify the device family, and inspect the area that matches the symptom. Use the focused repair guide for the full checklist and the device index when a model or part name is unfamiliar.
Are these ReStory gameplay tips official instructions?
No. The Steam page and store screenshots are cited for product context; the repeatable checklist is this site's practical method. Follow current in-game instructions when they differ.
Does every ReStory repair require a new part?
This guide does not assume that. Inspect the device and use the evidence available for the job before buying or replacing anything. A plausible-looking part is not proof of a fault.
Where can I find ReStory keyboard or controller controls?
This page does not publish a complete key or controller map because one was not verified for this guide. Check the current in-game prompts and settings. A screenshot showing one rotation prompt is not a full input specification.
How long does ReStory take to beat?
No verified completion-time figure is used here. See the separate ReStory playtime page for the official-source limit and a method for measuring a first route or replay.